

If you’ve ever dreamed of rocking Harley Quinn makeup without looking like you’re heading straight to a theatrical stage, you’re in the right place. This guide will show you how to channel her iconic chaotic glam while keeping your skin glowing, fresh, and totally wearable for everyday events.
Forget the heavy, cakey face paint that clogs pores and feels uncomfortable. We’re talking about a softer, more refined version that celebrates your natural beauty.
Think dewy skin, blended pastels, and a playful edge without the commitment of full on costume makeup. This is Harley with a Glamblushy twist: bold yet breathable, fun yet flattering.
Whether you’re prepping for a party, cosplay, or just want to experiment with color, this tutorial is beginner friendly and skin safe. Let’s dive into the world of wearable villainy.
Why the Natural Harley Quinn Look is Trending
Social media has shifted the beauty game. People no longer want to sacrifice skin health for a bold look.
The natural Harley Quinn trend embraces luminous, skin first makeup that looks editorial but feels effortless. It’s Instagram ready without the heavy filters.
Plus, clean beauty is on the rise. Makeup lovers are ditching harsh chemicals and theatrical products in favor of nourishing, lightweight formulas.
This look proves you can be edgy and elegant at the same time. It’s empowering, expressive, and totally on-brand for modern beauty enthusiasts.
Essentials You Need for an Easy Harley Quinn Makeup
Forget professional-grade face paint. Here’s what you actually need for a skin-friendly, glowy Harley transformation:
- Tinted moisturizer or BB cream: for a dewy, breathable base
- Cream blush in pink and peach: soft, blendable color for cheeks
- Pastel eyeshadow palette (pinks, blues, purples): buildable and gentle on lids
- White or ivory cream eyeshadow: for subtle highlighting, not stark paint
- Gel eyeliner in black: for smudged, smoky edges
- Lip tint or glossy lipstick (red or pink): keeps lips hydrated
- Brow gel: to keep brows groomed and natural
- Setting spray with hydrating ingredients: locks in makeup without drying
These products give you the color payoff without suffocating your skin. They’re also easy to remove and won’t cause breakouts.
Product Recommendations by Skin Type
Choosing the right products for your skin type makes all the difference. Here’s how to customize your Harley Quinn makeup essentials:
For Oily Skin:
Opt for a matte-finish tinted moisturizer or oil free BB cream to control shine throughout the day. Look for eyeshadow palettes with a powder formula rather than cream they’ll stay put without creasing. Choose a long wear gel eyeliner that won’t smudge in your T zone.Make sure everything is in place by applying a mattifying setting spray.
For Dry Skin:
Go for a hydrating tinted moisturizer with hyaluronic acid or glycerin. Cream eyeshadows and cream blushes are your best friends; they blend seamlessly and won’t emphasize dry patches. Pick a nourishing lip gloss with oils or butters to keep lips soft. Use a dewy setting spray with skin loving ingredients like rose water or aloe.
For Combination Skin:
Balance is key. Use a lightweight BB cream that’s neither too matte nor too dewy. Cream products work well on cheeks, but stick to powder eyeshadows on lids to prevent creasing. Apply mattifying powder only on your T zone, leaving the rest of your face glowy. A hydrating setting spray will keep everything fresh.
For Sensitive Skin:
Always choose hypoallergenic, fragrance free formulas. Look for mineral-based tinted moisturizers and eyeshadows free from parabens and sulfates. Avoid heavily pigmented products that may contain irritating dyes. Patch test everything 24 hours before full application, especially colorful eyeshadows and liners.
This targeted approach ensures your Harley Quinn makeup not only looks stunning but also feels comfortable and works with your skin not against it.
Pre Makeup Skincare: The Secret to a Flawless Natural Finish
Prepping your skin is non-negotiable. A clean, hydrated canvas makes all the difference between “gorgeous” and “heavy.”
Start with a gentle cleanser to remove oils and impurities.To balance your skin’s pH, follow up with a hydrating toner.
Next, apply a lightweight serum (hyaluronic acid works wonders) to lock in moisture. This creates a plump, smooth surface for makeup.
Finish with a nourishing moisturizer and let it absorb for a few minutes. Primer is optional, but if you choose one, go for something dewy and pore refining.
This step ensures your makeup sits beautifully and lasts longer. Plus, it protects your skin from potential irritation caused by colorful products.
Trust us, your skin will thank you later.
Step by Step Tutorial: Natural Harley Quinn Makeup
Step 1: The Dewy Base
Start with your tinted moisturizer or BB cream. Apply it with your fingers or a damp sponge for a skin like finish.
Don’t aim for full coverage. Let your natural skin texture peek through this is what makes the look modern and breathable.
A creamy concealer can be used to conceal any blemishes or dark circles.Blend gently and set lightly with translucent powder only on the T zone.
Skip heavy contouring. Instead, add a subtle cream highlighter to your cheekbones, nose bridge, and cupid’s bow for that Glamblushy glow.
Pro Tip for DIY Harley Quinn makeup: Mix a drop of liquid highlighter into your moisturizer for an all over radiant boost without shimmer overload.
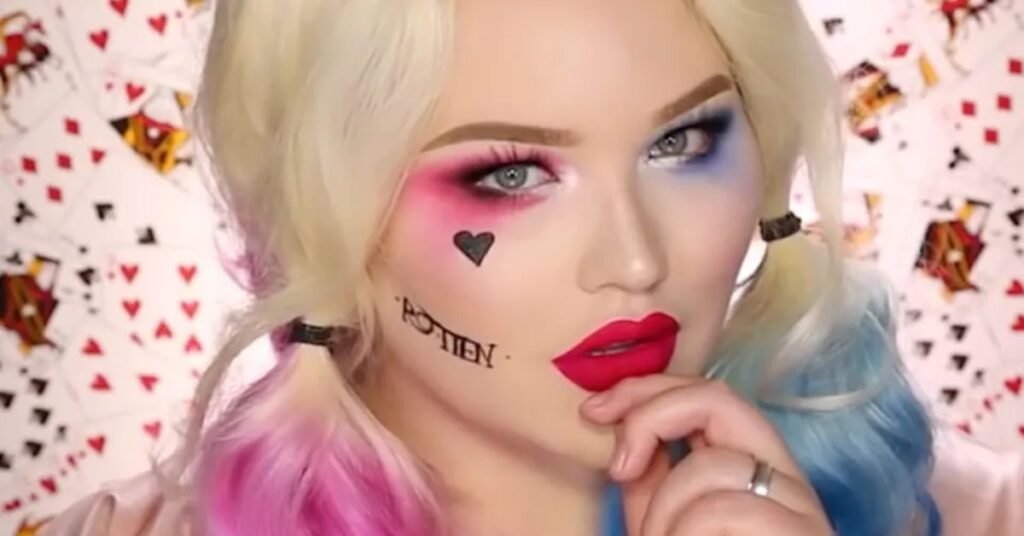
Step 2: The Mismatched Eyeshadow
This is Harley’s signature. Pink on one eye, blue on the other but we’re doing it with finesse.
Use a fluffy brush to sweep a soft pink shade across one eyelid, blending up toward the brow bone. Keep the edges diffused, not harsh.
On the other eye, apply a baby blue or pastel blue. Blend it the same way for symmetry in technique, not color.
Add a touch of shimmer or pearl shadow to the center of each lid for dimension. This makes the look editorial, not costume y.
Pro Tip for DIY Harley Quinn makeup: Use your ring finger to pat on color; it gives the most natural, blended application without patchiness.
Step 3: The Signature Smudge
Harley’s smudged eyeliner is iconic, but it should look intentional, not messy. Here’s how to nail it.
Line your upper lash line with black gel liner, keeping it slightly thicker toward the outer corner. Don’t worry about perfection.
Use a small smudge brush or your fingertip to gently blur the line. Drag it slightly downward and outward for that “lived in” vibe.
On the lower lash line, do the same. Smudge the liner under your eyes, focusing on the outer half for a sultry, smoky effect.
Add a tiny bit of the pink or blue eyeshadow under each eye (matching the opposite lid) to tie the look together.
Pro Tip for DIY Harley Quinn makeup: Set the smudge with a matching eyeshadow shade so it stays put without looking too sharp or fading throughout the day.
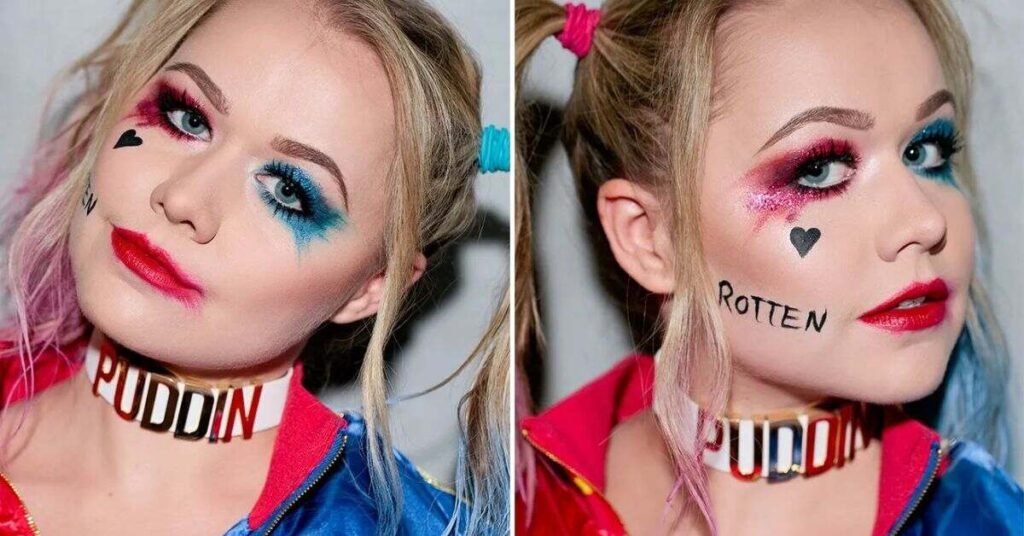
Step 4: The Heart Tattoo & Finishing Touches
Use a thin eyeliner or brow pencil to draw a small heart on your cheek. Keep it simple a single outline is enough.
Fill it in lightly if you want, or leave it hollow for a softer look. This adds Harley’s playful edge without going overboard.
Apply a rosy cream blush to the apples of your cheeks. Blend upward for a lifted, youthful flush.
Swipe on a glossy red or pink lip. Choose a hydrating formula that won’t dry out or crack.
Finish with a dewy setting spray. Mist it lightly to lock everything in while maintaining that fresh, glowy finish.
Pro Tip for DIY Harley Quinn makeup: Add a dot of gloss to the center of your lips and the inner corners of your eyes for extra dimension and light reflection.
Suicide Squad Birds of Prey Harley Quinn Looks

Harley’s look evolved drastically between these two films. Let’s break down which suits the “natural makeup” vibe better.
Suicide Squad This version features stark white face paint, bold red and blue eyeshadow, and heavy black liner. It’s theatrical and dramatic perfect for cosplay, but not everyday wearable.
Birds of Prey Harley ditched the face paint for a more human, relatable look. She embraced glitter, pastels, and softer edges. This version is far easier to adapt into a natural glam style.
Key Differences:
| Suicide Squad | Birds of Prey |
| Full white base | Natural skin tone |
| Heavy, defined lines | Softer, blended colors |
| Theatrical vibe | Editorial, wearable |
| Requires face paint | Uses regular makeup |
For a Suicide Squad makeup tutorial with a natural twist, skip the white base entirely and focus on the color blocking technique using soft creams instead of harsh paints.
Birds of Prey wins for versatility and skin-friendliness. It’s glamorous, playful, and totally adaptable for real life.
Conclusion: Rock Your Natural Harley Quinn Makeup
You don’t need heavy theatrical products to channel Harley’s iconic energy. With the right techniques and skin loving products, you can create a look that’s bold, beautiful, and breathable.
This natural approach celebrates your skin while letting you play with color and creativity.The perfect blend of fun and sophistication.
Makeup should enhance your confidence, not compromise your skin’s health.. Prep well, blend beautifully, and finish with care.
FAQs:
1. How do I remove Harley Quinn makeup without irritating my skin?
Cleanse with micellar water or an oil-based cleanser. Rinse it with lukewarm water after massaging it in circular motions. Follow with your regular skincare routine.
2. Can I wear Harley Quinn makeup every day?
Absolutely! The natural version is lightweight and wearable. Just tone down the intensity for daytime by using sheer washes of color.
3. What if I have sensitive skin?
Opt for hypoallergenic, fragrance-free products. Always patch test new items and avoid harsh chemicals or heavy face paints.
4. How long does this makeup last?
With proper prep and setting spray, it can last 6–8 hours. Touch up your gloss and setting spray as needed.
5. Is this look suitable for beginners?
Yes! All skill levels can benefit from this tutorial.. Take your time, blend well, and don’t stress about perfection.